As
this was my first brake pad installation, I found it to
be extremely easy to do, even for a beginning Z chick mechanic!
I did have my husband there to supervise since he has done
brake pad changes for the past 10 years. The Hawk HPS pads
did not include any instructions, so it was good that I
had his guidance, and I would suggest that beginners like
me, have someone with you the first time you attempt this,
to avoid any mistakes.
We
started by going down to the local firehall to use the engine
bay. It is nice to have the room to work, and access to
all the tools that are there.
First
you will want to loosen your lug nuts using the lug wrench
provided in your trunk space, in right hand corner closest
to the rear of the car, or use an air gun with 21 mm socket
if you have access. Don't loosen them all the way yet, just
crack them loose. I found it impossible to avoid scratches
inside the pocket where the lug nuts are seated (you can
wrap a soft rag, paper towel, or electrical tape around
the socket). After loosening the lugs, locate the designated
jack space on your frame. The most desirable place to jack
you car up from is the jack space in the center of the frame,
just behind and between the front wheels. You can jack it
up from the side, but you will have to do it two times where
as you only have to jack it up once if you do it from the
center of the frame. There are two markers that you place
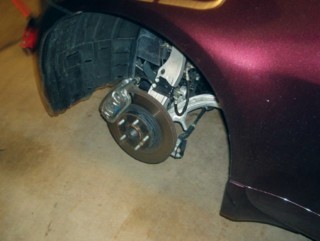
the jack between. Once the car is sufficiently jacked up,
tires not touching the ground, you can loosen the lug nuts
all the way, and take the wheels off.
The
caliper sits on top of the rotor, and the brake pads. If
you turn the steering wheel towards you, it is easier to
locate the bolts holding the caliper on. They are on the
back side, one bolt on the left, one on the right. You will
need a 9/16 inch (14 mm) wrench, or socket wrench. First
loosen both bolts, and then unbolt them totally. You can
now carefully lift the caliper off the brake pads and rotor.
It will hang down out of the way after removal.
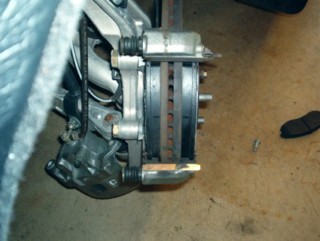
Remove the brake pad on the outside of the wheel by lifting
the clip on the right hand side of the pad and lift the
brake pad up and out. Do the same for the back side pad.
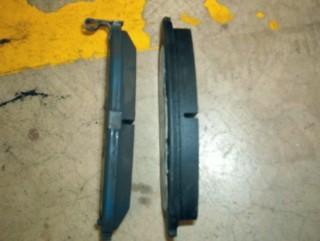
The OEM pads have clips on both the inside and outside pads,
the Hawks come only with one clipped pad per set. We chose
to use the clipped pad on the outside location. Take the
new pad, and insert the clip-free end into the groove provided,
and then snap in the clip side. It should click in. Use
the same method on the inside, but remember this time that
there is no clip. The pad should sit in tight. The rotors
are floating so you may have to play with them until the
pads line up flush with the top of the rotor. (On the inside
OEM pad there is a thin metal plate that the piston pushes
against; you can remove it and clip it on the new inside
pad.)
Using
a C-clamp, you will need to push in the part of the caliper
that is shaped like a suction cup (it is the part that clamps
onto the pads). Use even pressure on either cup and the
other one will retract too. This will allow you to sit the
caliper back on the pads and rotor without friction. Once
you push that in, gently sit the caliper on, and insert
the bolts back, hand tightening both, and then tighten with
a wrench. If you are using a socket wrench, watch the torque
as you can fracture or break the bolt. (Alternatively, you
can use the C-clamp before completely removing the caliper
— partially raise the caliper, place the C-clamp and
then remove the caliper.)
After
the bolts are tight, you can remount the wheel. Hand tighten
the lug nuts, then give them a few turns with the lug wrench,
and wait to tighten completely until after the car is down
off the jack.
Now,
you are ready for your second set of brake pads.
After
letting the car down off the jack, tighten the lug nuts
all the way. Take you car out for a test drive, listening
with the windows open for any unusual sounds, grinding,
crunching, or squealing. These are signs that something
is not right. Test the brakes out to make sure they are
grabbing well, if all feels right, you have just installed
your new brake pads successfully.
Set
the pads by doing 5-10 medium brake pressure stops from
30-35 mph, and then 5 hard stops from about 40 mph. Your
brakes will be hot after this, so take your Z for a 10 minute
brake cool down drive.