How
to Install
Rallitec Q-Shifter
(short throw shifter)
on a 350Z ('03 or '04)
Introduction:
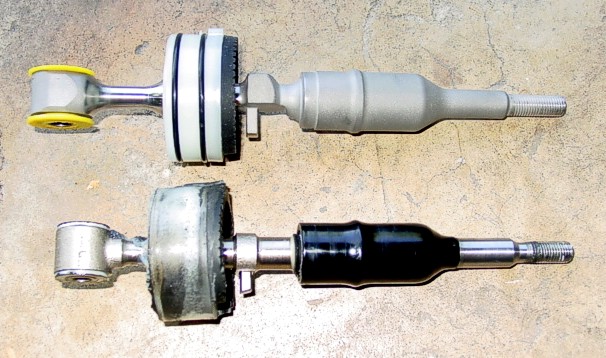
The shifter comes in either titanium or stainless steel
(same installation procedure). You may have to recut the
threads so you can screw the shifter knob on. Recommend
testing the fit of the shift knob before installing the
shifter. Hopefully, this issue will be fixed in future production
runs. You may also have up to a four-month wait for delivery
since production is only done when there are enough orders.
Be sure to order the version with the modified control socket.
Note that they have made some production changes, so what
you get will not look like the pictures on their web site.
Http://www.rallitec.com/q-shifter
Tools
and Materials Needed:
Shifter
Removal and Installation:
1.
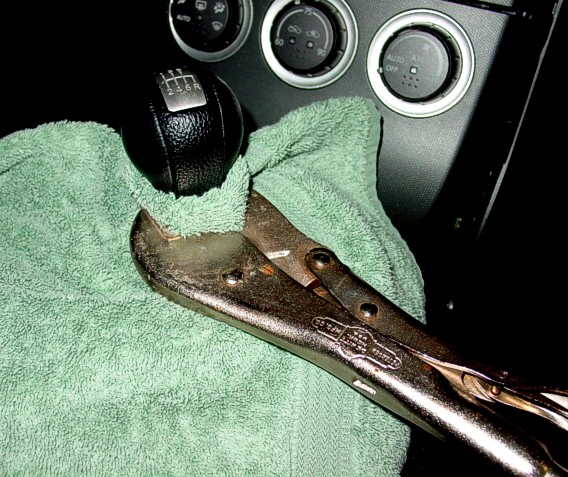
Fold a thick hand towel and wrap around neck of shift knob.
Place vise-grips with jaws on the flat sides of the knob.
It should be tight enough so it won't slip with quite a bit
of force. Make sure the jaws are above the plastic piece at
the bottom of the knob. Turn knob counterclockwise. It will
take quite a bit of force and the shift lever actually twists
before the knob starts to come loose.
2.
Inside the knob there is a beveled metal bushing and a rubber
bushing. Don't lose these because they will be needed when
you put it all back together.
3.
Put your hand inside the ring around the gear shift opening
at the rear of the console and pull up. The console will snap
out fairly easily.
4.
Using the flat-blade screwdriver, push down on the wiring
connector locking tang as you pull the connector free. Use
caution not to pull on the ribbon cable because it is fairly
delicate.
5.
If it doesn't come off with the console and leather shift
boot, remove the white fiber insulation.
6.
Using the 10mm socket remove the four bolts securing the metal
upper shift boot retainer. Remove the retainer and work the
rubber boot up the shifter shaft and remove.
7.
Remove the rubber inner boot from the retaining groove, and
work it up the shifter shaft and remove.
8.
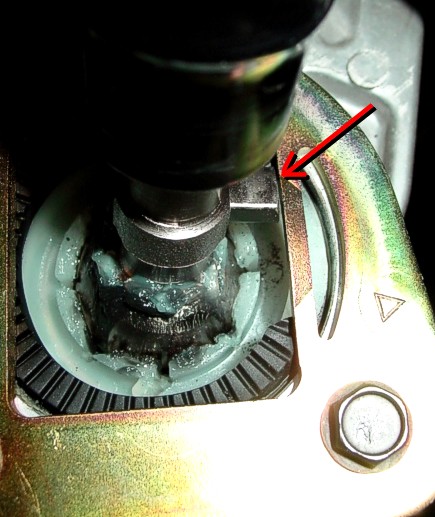
Put the car in 5th gear (use the clutch, but don't start the
engine), and measure the distance from the reverse lock tang
to the metal guide plate (passenger's side of the shift lever).
Repeat the measurement in 6th gear. The distance should be
about 2mm.
9.
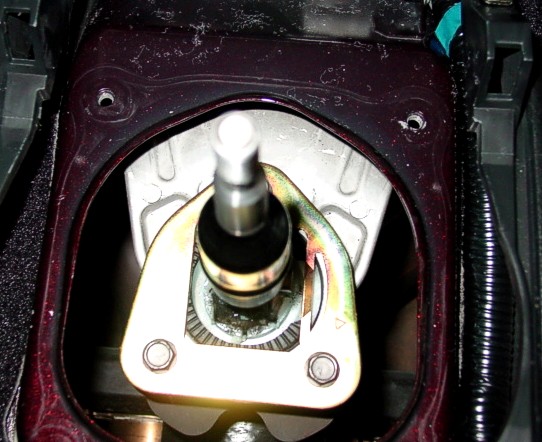
Remove the three 10 mm bolts from the guide plate and remove
the guide plate. There is a large spring pushing up on the
control socket and plate, so hold the plate down as you remove
the bolts.
10.
Jack the car up fairly high on one side (it doesn't matter
which side) so you have some room to work under it, and place
the jackstand.
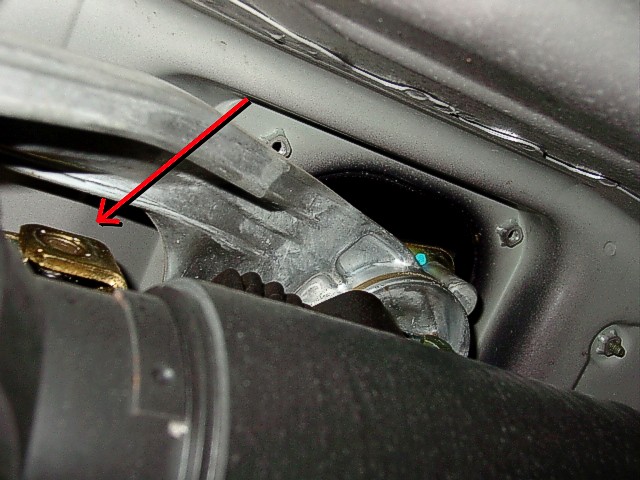
11.
Remove the rubber sealing boot from its retaining groove on
the driver's side. Use the 12 mm socket to remove the bolt.
Don't try to remove the nut on the passenger side, it's welded.
12.
Crawl back out and slide the old shifter out from the top
side.
13.
Pack grease in the new control socket (top and bottom). Put
grease inside the grommet where the shifter attaches to the
linkage, and slide the metal bushing into the grommet. A little
grease inside the metal bushing won't hurt either.
14.
Slide the new shifter in, making sure the key on the white
control socket lines up with the keyway on the driver's side,
and the reverse lock tang faces toward the passenger's side.
Slide it in until the control socket is flush with the top
of its housing.
15.
Crawl back under and slide the bolt back in and tighten. You
may have to move the shifter around with your finger to get
the holes to line up. Do NOT overtighten the bolt! If you
overtighten, you will not be able to move the shifter.
16.
Test out the shifter feel by running through the shift pattern
with the clutch in. Make small adjustments in the tightness
of the bolt until you have the feel you want. You may want
to place another nut over the end of the bolt to secure it
so it won't back out (optional).
17.
Reseat the rubber boot: snap it on the front part first, and
then pull the two ears toward the rear of the car so it slides
up into place. Check that it is seated in the retaining groove
all around. You'll do most of this step by feel because the
drive shaft obscures your view.
18.
Place the metal guide plate on and tighten the three bolts
to finger tight. Establish the same clearance between the
reverse lock tang and the guide plate that you previously
measured; about 2mm.
19.
My optional engineering mod. Since the side-to-side throw
is also reduced, you will have some extra play toward the
driver's side. Cut a sturdy plastic piece to go on top of
the metal guide plate to act as a stop, so the shift lever
exactly hits the 1st and 2nd gear gates. The plastic piece
is the exact same size as the metal guide, and same bolt pattern,
it just has a smaller hole with the extra bit being on the
driver's side. this may take some trial before you get it
just right. Instead of the overlay, you could fabricate a
new metal plate, but the plastic avoids metal to metal wear.
Check all six forward gears and reverse for proper action.
20.
Tighten the three bolts, and place the rubber boot back on
securing it in the retaining groove.
21.
Place the second rubber boot over the shifter and secure it
with the metal plate and four bolts. Do not overtighten the
bolts, because you can bend the metal plate.
22.
Place the white fiber padding over the shifter.
23.
Reattach the air conditioning control cable to the console
connector.
24.
Place the console back on, by inserting the front tangs first
and then pushing down on the rear until it locks into place.
25.
Make sure the metal bushing with the beveled side down is
placed over the shifter, and followed with the rubber bushing
(they may still be inside the shift knob). Screw the shift
knob back on. Keep in mind how tight it was in the first place
and tighten it likewise as you replace it. Double check that
you can smoothly shift into all six forward gears and reverse.
NOTE
1: Test fit the knob on the shifter before you install it,
and if it does not screw on correctly, you may have to recut
the threads with a 10 mm 1.25 pitch die.
NOTE
2: In the past, there were issues raised with noise and vibration
of the shifter. On this installation, none of these issues
arose. In fact there is probably less noise and vibration
than stock in this installation. Aside from the shift knob
threading issue, the shifter is well made.
Questions:
E-mail Tere
Original
Installation Manual (as of this writing, the link on the web
site to the manual was not operational). You will not need
to do the control socket removal and replacement steps shown
in the manual if you order the shifter with the modified control
socket.
Quick
shifter install v1.1 .pdf
Click
on each photo for a larger image
|