How
to Install
TopSpeed Short-Shifter
(short-throw shifter)
on a 300ZX ('90 - '96)
Introduction:
First, let's clear up some misconceptions running around
the 300ZX world about short-throw shifters. Seems a lot
of folks are installing shortened stock (or aftermarket)
shifters and calling them a "short-shifter." They
are not true short-throw shifters—they reduce the
shift travel by lowering the height of the shift knob. A
true short-throw shifter is longer than a stock shifter—the
lengthened portion is below the control socket (fulcrum).
The shift knob will remain at stock height; in fact the
only way you will know that it's a short-shifter is when
you shift—it will be a shorter throw. (See the short-shifter
install article on the 350Z for a photo comparison.)
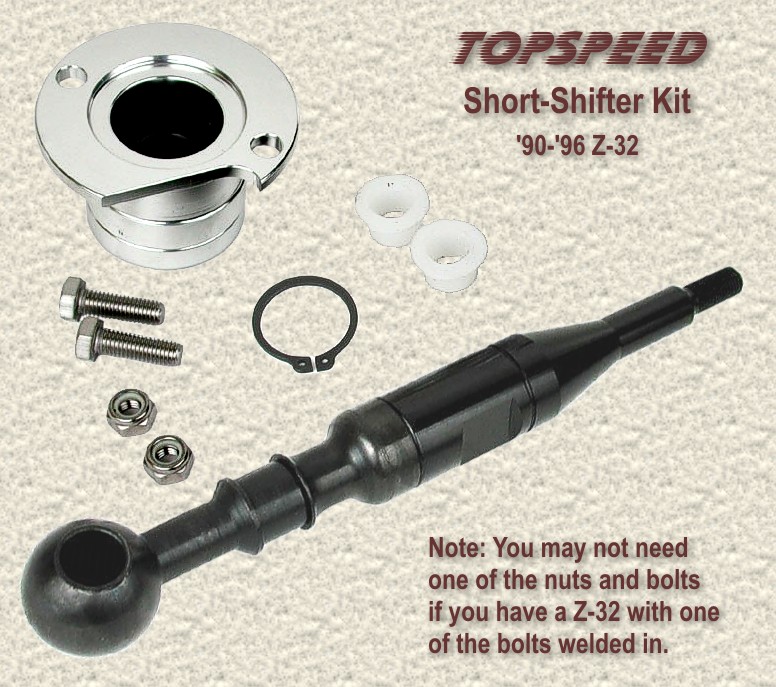
Notes:
Your 300ZX may have one of the control socket bolts welded
in. If this is the case, you will not need one of the bolts
in the kit. The kit we got from Courtesy included a GReddy-like
shift knob—we don't know whether this was a special
deal or if the kit always comes with the knob. You can also
use this "how to" to replace worn stock shifter
bushings—the bushings on our 300ZX were worn to nothing
which explains the very sloppy shifter.
Tools
and Materials Needed:
-
Phillips
and flat head screw drivers
-
Channel
locks or vice grips
-
Thick
towel
-
12
mm open end and ratcheting wrench
-
1/4" drive ratchet
-
Short
12 and 13mm 1/4" socket
-
3/8" drive ratchet
-
Any
12 mm 3/8" drive socket
- 3/8"
extension
- 23mm
open end or crescent wrench
-
Magnetic
pickup tool (in case a nut or bolt falls down)
- Grease
(white lithium is good)
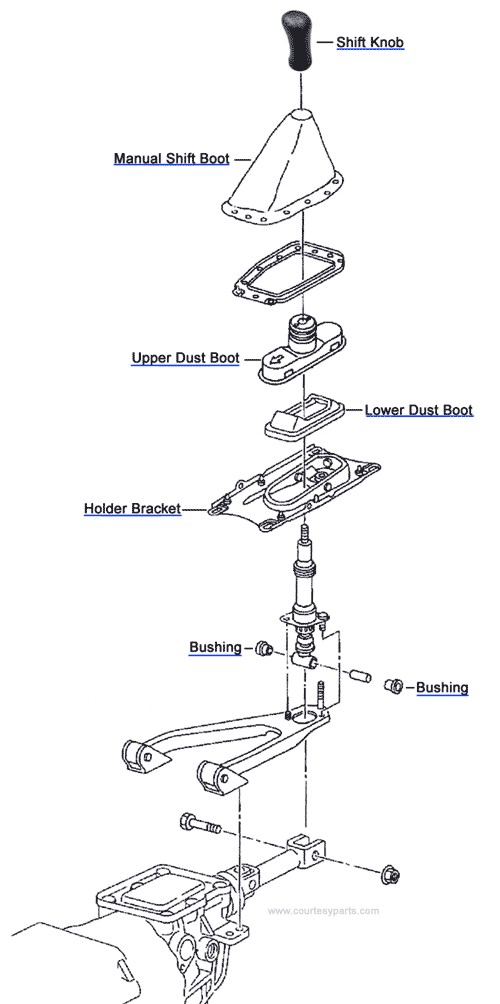
Shifter
Removal and Installation:
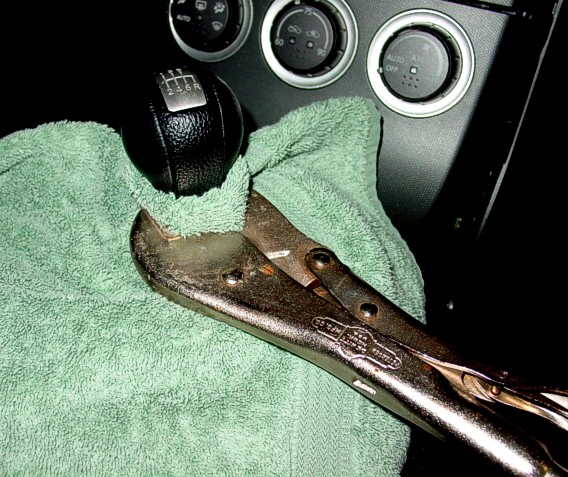
1.
Fold a thick hand towel and wrap around neck of shift knob.
Place vise-grips (or channel locks) on the shift knob. It
should be tight enough so it won't slip. Turn knob counterclockwise.
It may take quite a bit of force.
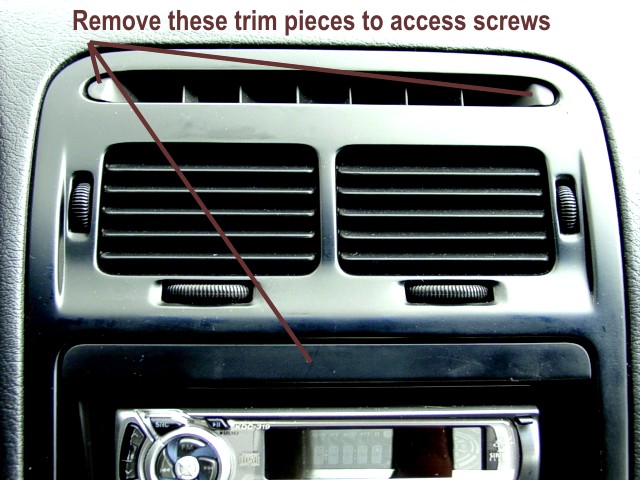
2.
Remove the center dash section (4 screws). Two screws under
two small trim pieces above the air vents, and two screws
under the trim between the air vents and audio. If you want
to completely remove the section, you will have to unhook
the connections to the center dash components.
3.
Remove the center console (3 screws). The rear screw is under
the ash tray—remove the ash tray to access it. Unhook
the electrical connections.
4.
Remove the upper and lower dust boots.
5.
Remove the holder bracket (four 12mm bolts).
6.
Remove the control socket nuts and bolts (one bolt may be
welded in).
7.
Remove the 12mm shifter attach bolt and remove the shifter.
8.
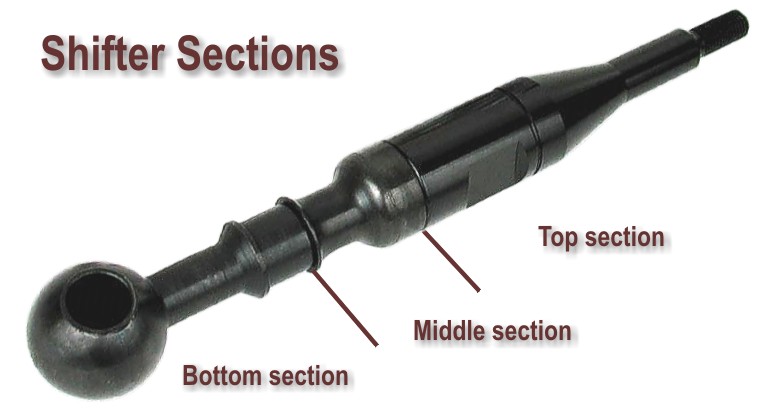
The new shifter is actually three pieces. Take the bottom
piece with the hole though it and place the bushings and the
stock metal spacer that holds them in place. Put some grease
inside the spacer and bushings.
9.
Pass this piece through the transmission link assembly, and
attach, using the stock 12mm nut and bolt, to the shifter
linkage. You may have to spread the shifter linkage arms slightly
in order to slide the shifter in. Do not over tighten the
bolt; 15 foot pounds at the most.
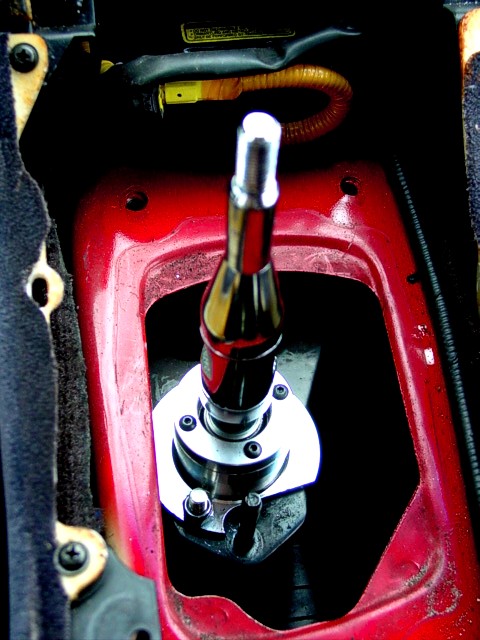
10.
Then take the control socket (flanged side down) and attach
using one of the 13 mm nuts and bolts that come with the shifter.
The other nut and bolt that come with the kit may not be needed
if one of the bolts is welded on the transmission link assembly.
11.
Next use the piece that looks like an offset hour glass (middle
shifter section) and slide that over the threaded rod on the
bottom piece of the shifter. Pack some grease around the middle
piece before you slide it into the control socket.
12.
Lastly, put the top piece of the shifter on. Tighten that
by using a 23 mm open end or crescent wrench.
13.
Slide the holder bracket over the shifter and secure with
washer and nut.
14.
Secure the four 12 mm bolts on the holder bracket to the body
of the car.
15.
Attach the upper and lower dust boot together and place over
shifter. Make sure the arrow on the upper dust boot is facing
forward.
16.
Slide the metal C-clip over the shifter and into the upper
groove of the top shifter piece. This compresses the upper
dust boot and holds it in place.
17.
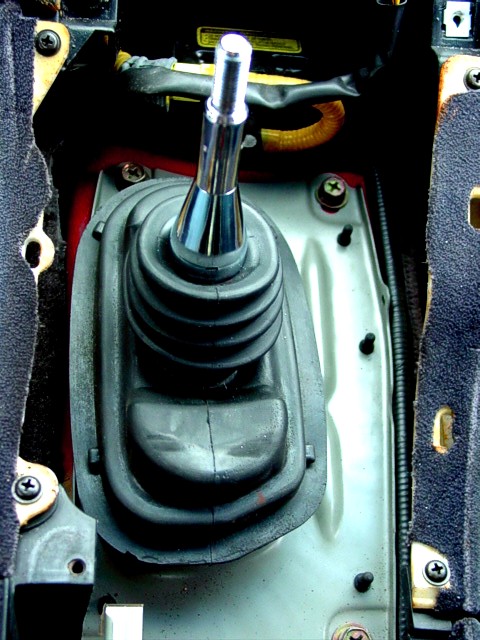
Hook up the center console electrical connections and install
the center console piece with the shift boot (3 screws).
18.
If you unhooked the center dash pannel electrical connections,
hook them back up and install the radio trim (4 screws).
19.
Screw on the shift knob and now instead of playing "tag-you're-it"
with the dash board from 4th to 5th, you're making nice smooth,
minimal flicks of the wrist. Gosh, what a difference.
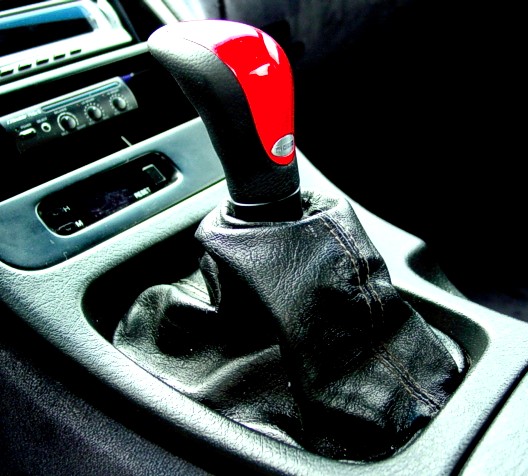
Note:
You can further reduce the shift throw distance by using a
shorter shift knob—the stock 300ZX shift knob is very
tall. We opted for the shorter MOMO Combat with red insert
(close match to the AH3 paint) shift knob. The MOMO is ergonometrically
designed and has a great feel to it (looks good too).
Click
on each photo for a larger image |